Services
Providing Superior Quality Materials for Tile Installation
Providing superior-quality materials for tile installation, TILEX ensures durability, precision, and long-lasting performance. We source only reliable products that meet the highest industry standards.
Vertified Tiles, Marbles, Granites. Quartz, Adhesives, Spacers and Joint Epoxy Fillers


Executed with Professionalism and Delivered through Highly Skilled Workmanship.
We provide detailed technical drawings and advanced 3D visualizations, along with accurately prepared Bills of Quantities (BOQ) to ensure clarity and cost transparency. Our projects are executed using advanced equipment and precision tools, under the supervision of qualified professionals to deliver superior workmanship and consistent quality.

Repair & Maintenance
We provide broken tile replacement, leakage rectification, re-roofing and renovation works, along with precise tile correction and re-grouting to restore strength, safety, and aesthetics to your spaces.
Tile Adhesive & Grouting
We offer expert tile adhesive application, cement and epoxy grouting, chemical-based fixing solutions, and premium finishing systems to ensure durable performance and a flawless finish on every project.

Waterproofing Solutions
We offer reliable bathroom and wet-area waterproofing, terrace and slab waterproofing, effective roof leakage treatments, and durable expansion joint sealing solutions.

Roofing Tile Installation
We specialize in clay and concrete roof tiles, complete sloped and villa roofing systems, precise ridge, hip and valley fixing, sturdy batten and framework installation, and efficient gutter and rainwater management systems.
Tile Laying Services
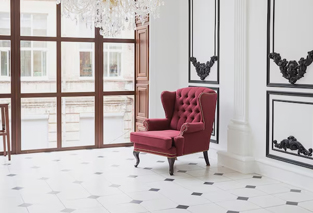
We provide expert floor tile laying in vitrified, ceramic, and granite, along with wall tile installation, bathroom and kitchen tiling, outdoor, parking and pathway tiles, and elegant elevation and decorative tile works.
Repair & Maintenance
We provide broken tile replacement, leakage rectification, re-roofing and renovation works, along with precise tile correction and re-grouting to restore strength, safety, and aesthetics to your spaces.
Tile Adhesive & Grouting
We offer expert tile adhesive application, cement and epoxy grouting, chemical-based fixing solutions, and premium finishing systems to ensure durable performance and a flawless finish on every project.
Waterproofing Solutions
We offer reliable bathroom and wet-area waterproofing, terrace and slab waterproofing, effective roof leakage treatments, and durable expansion joint sealing solutions.
Roofing Tile Installation
We specialize in clay and concrete roof tiles, complete sloped and villa roofing systems, precise ridge, hip and valley fixing, sturdy batten and framework installation, and efficient gutter and rainwater management systems.
Tile Laying Services
We provide expert floor tile laying in vitrified, ceramic, and granite, along with wall tile installation, bathroom and kitchen tiling, outdoor, parking and pathway tiles, and elegant elevation and decorative tile works.
Our Work Process
Surface Preparation
Ensure the surface is clean, dry, level, and structurally sound by removing all dust, grease, old adhesive residues, and loose materials. Verify surface flatness using a straightedge; deviations should not exceed 2–3 mm over a 2-meter span. Apply a suitable primer where required, particularly on concrete, screed, or plaster substrates, to enhance adhesion and performance.

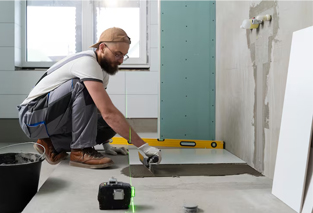
Planning & Layout
Accurately measure the room and establish center lines as the starting reference. Perform a dry layout of tiles to minimize small cuts at edges and achieve visual balance. Determine the appropriate tile direction and laying pattern—such as straight, brick, or herringbone—and mark precise reference lines using a chalk line or laser level for accurate installation.
Adhesive Mixing
Select the appropriate adhesive based on the tile type and substrate—such as cement-based, flexible, rapid-set, or epoxy adhesives. Mix thoroughly using a paddle mixer at low speed to achieve a uniform consistency. Allow the adhesive to rest (slake) for 5–10 minutes, then remix briefly before application to ensure optimal performance.
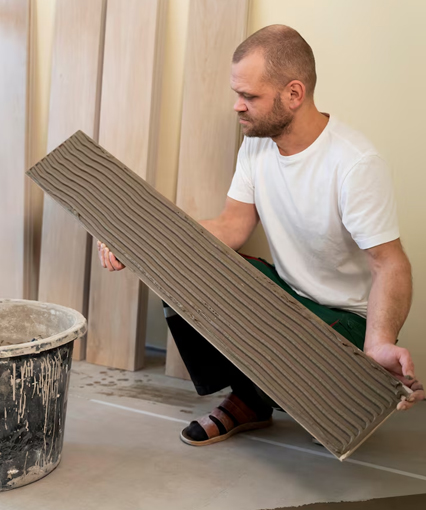
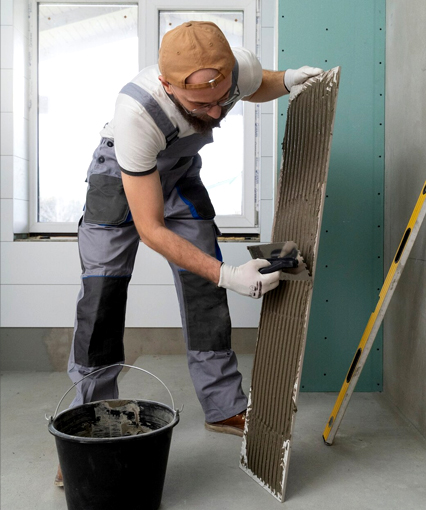
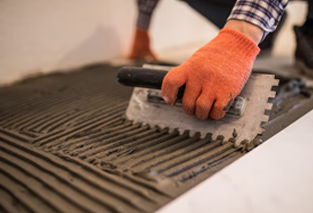
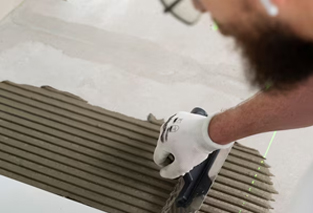
Applying Adhesive
Apply the adhesive evenly using the flat side of the trowel to ensure proper contact, then comb it with the notched side held at a 45° angle to achieve uniform ridges. For large-format tiles (600 mm and above), adopt the buttering-back method to ensure full coverage and superior bonding.
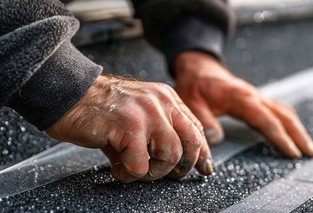
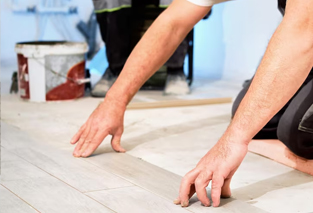
Laying the Tiles
Press tiles firmly into the adhesive with a gentle twisting motion to ensure proper bonding. Use tile spacers or leveling clips to maintain consistent joint widths, and continuously verify alignment using a spirit level or laser. Remove excess adhesive from joints immediately to achieve a clean finish and facilitate proper grouting.
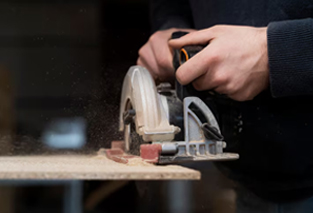
Cutting Tiles
Use a manual tile cutter for accurate straight cuts, a wet saw for porcelain or large-format tiles, and an angle grinder for notches and curved cuts. Finish by smoothing all cut edges with a rubbing stone to ensure safety and a refined appearance.
Curing Time
Allow tiles to remain undisturbed during curing—24 hours for standard adhesives and 3–6 hours for rapid-set adhesives. Avoid walking on the tiled surface during this period to ensure proper bonding and long-term durability.
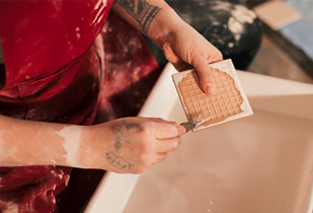
Grouting
Remove spacers or leveling clips once the adhesive has cured, then mix the grout to a smooth, creamy consistency. Apply the grout diagonally across the joints using a rubber float to ensure full joint filling. After the initial set, gently clean off grout haze with a damp sponge to achieve a neat, professional finish.
Final finishing
After the grout has fully cured, clean and polish the tiles using a dry, soft cloth to achieve a flawless finish. Apply high-quality silicone sealant at all corners and designated movement joints to ensure flexibility and long-term protection. Finally, conduct a thorough inspection to identify any hollow sounds or uneven tiles, ensuring the installation meets the highest quality standards.
Surface Preparation
Ensure the surface is clean, dry, level, and structurally sound by removing all dust, grease, old adhesive residues, and loose materials. Verify surface flatness using a straightedge; deviations should not exceed 2–3 mm over a 2-meter span. Apply a suitable primer where required, particularly on concrete, screed, or plaster substrates, to enhance adhesion and performance.
Planning & Layout
Accurately measure the room and establish center lines as the starting reference. Perform a dry layout of tiles to minimize small cuts at edges and achieve visual balance. Determine the appropriate tile direction and laying pattern—such as straight, brick, or herringbone—and mark precise reference lines using a chalk line or laser level for accurate installation.
Adhesive Mixing
Select the appropriate adhesive based on the tile type and substrate—such as cement-based, flexible, rapid-set, or epoxy adhesives. Mix thoroughly using a paddle mixer at low speed to achieve a uniform consistency. Allow the adhesive to rest (slake) for 5–10 minutes, then remix briefly before application to ensure optimal performance.
Applying Adhesive
Apply the adhesive evenly using the flat side of the trowel to ensure proper contact, then comb it with the notched side held at a 45° angle to achieve uniform ridges. For large-format tiles (600 mm and above), adopt the buttering-back method to ensure full coverage and superior bonding.
Laying the Tiles
Press tiles firmly into the adhesive with a gentle twisting motion to ensure proper bonding. Use tile spacers or leveling clips to maintain consistent joint widths, and continuously verify alignment using a spirit level or laser. Remove excess adhesive from joints immediately to achieve a clean finish and facilitate proper grouting.
Cutting Tiles
Use a manual tile cutter for accurate straight cuts, a wet saw for porcelain or large-format tiles, and an angle grinder for notches and curved cuts. Finish by smoothing all cut edges with a rubbing stone to ensure safety and a refined appearance.
Curing Time
Allow tiles to remain undisturbed during curing—24 hours for standard adhesives and 3–6 hours for rapid-set adhesives. Avoid walking on the tiled surface during this period to ensure proper bonding and long-term durability.
Grouting
Remove spacers or leveling clips once the adhesive has cured, then mix the grout to a smooth, creamy consistency. Apply the grout diagonally across the joints using a rubber float to ensure full joint filling. After the initial set, gently clean off grout haze with a damp sponge to achieve a neat, professional finish.
Final finishing
After the grout has fully cured, clean and polish the tiles using a dry, soft cloth to achieve a flawless finish. Apply high-quality silicone sealant at all corners and designated movement joints to ensure flexibility and long-term protection. Finally, conduct a thorough inspection to identify any hollow sounds or uneven tiles, ensuring the installation meets the highest quality standards.


From floor and wall tiling to complete roofing systems, we deliver every project with expert precision, professional responsibility, and uncompromising integrity.
- Skilled and experienced tile applicators
- Technical supervision on every project
- Precise surface preparation and alignment
- Quality materials and approvedsystems
- Timely delivery with clean workmanship
- Transparent and professional execution

Terms of use |
Privacy Policy |
Contact us
Tilex © 2026 All rights reserved
Designed and developed by Koco Digital